
Everyone is talking of UPI payments and how it changes everything in the world of digital payments. It is being touted as the major driver that will take us to being a cashless economy, along with mobile wallets.
For most of us it remains that elusive genie that will make all our payment wishes come true IF ONLY we knew how to rub the lamp the right way. Welcome to OpIndia’s simple no BS guide to UPI, where we tell you how to get started with UPI in under 10 minutes.
Let’s go!
So what is UPI?
UPI is short for Unified Payment Interface. It’s the netbanking transfer for the mobile first generation. Quick to setup, quick to transfer money to another account. No bank account number needed, no logging in, no waiting, and no IFSC code. All you need to know is a username (called VPA or Virtual Private Address) to send money to anyone within seconds.
Why was UPI needed?
Netbanking wasn’t as efficient and quick. Netbanking was made for the internet; to make it secure, the extra steps required made the whole process of transferring money cumbersome, even with IMPS. A Mobile first solution like UPI takes away a lot of friction as we will see. It’s available 24×7, including on holidays.
Say, you need to buy from your local shop or local supermarket. You don’t want to take note of their bank details, add and confirm them as beneficiary, and then log into your netbanking or mobile banking app each time you buy something, where you would need to wait for OTP and provide information like those grid numbers on the back of your debit card. That’s just too much of work when all you have bought is a box of chips and some cold drinks!
How it’s different from mobile wallets?
Mobile wallets are apps that hold your money. With a Wallet you add money from your bank account using net banking or bank cards. The UPI app transfers money from one bank account directly into other just like netbanking IMPS transfer, there is no need for 3rd part apps to hold the money anymore.
So will UPI kill mobile wallets?
Wallets provide an added layer of security and also have a lot of 3rd party integrations that make it easier to pay your bills and make payments at stores or cab services. For example, you can add money to PayTM wallet and use it to pay bills, recharge phone, shop their own marketplace or other online merchants and pay for your Uber rides. UPI apps and ecosystem will take some time to get there, but once it does the charm of wallet apps will certainly go down.
Mobile wallets won’t just vanish, and they will need to innovate and make them more attractive than UPI payments, which currently they are due to ease of payments and lots of offers that they have. Most probably wallets will add UPI as one of the options for payment and not rival them.
What can I do with UPI now?
For now, you can use UPI to pay for everything you have been using netbanking transfers for. You’ll need the receiver’s VPA, and if they don’t have it, you’ll have to ask them to install a UPI app first.
(Update: UPI transfers can take place even on feature phones where no VPA or UPI app will be needed – as is explained here – but the scope of this article is about currently available apps on smartphones)
But since it’s so easy and useful and removes the need for wallet apps for certain transactions, you will soon see everyone using it for things like paying for cabs, paying at the local store, or splitting their expenses.
How much we can do with it will depend on how fast we can all move to UPI payments. For now, play with it and tell your friends about this new cool way to split your weekend bills.
Can I start using UPI immediately?
If you have a bank account, and if you have enabled netbanking and mobile banking i.e. if you have generated an MPIN (usually 4 to 6 digit long depending on the bank) for your account, you are ready to use UPI. Remember that your phone number, where you are going to install this app, must be linked to at least one such bank account.
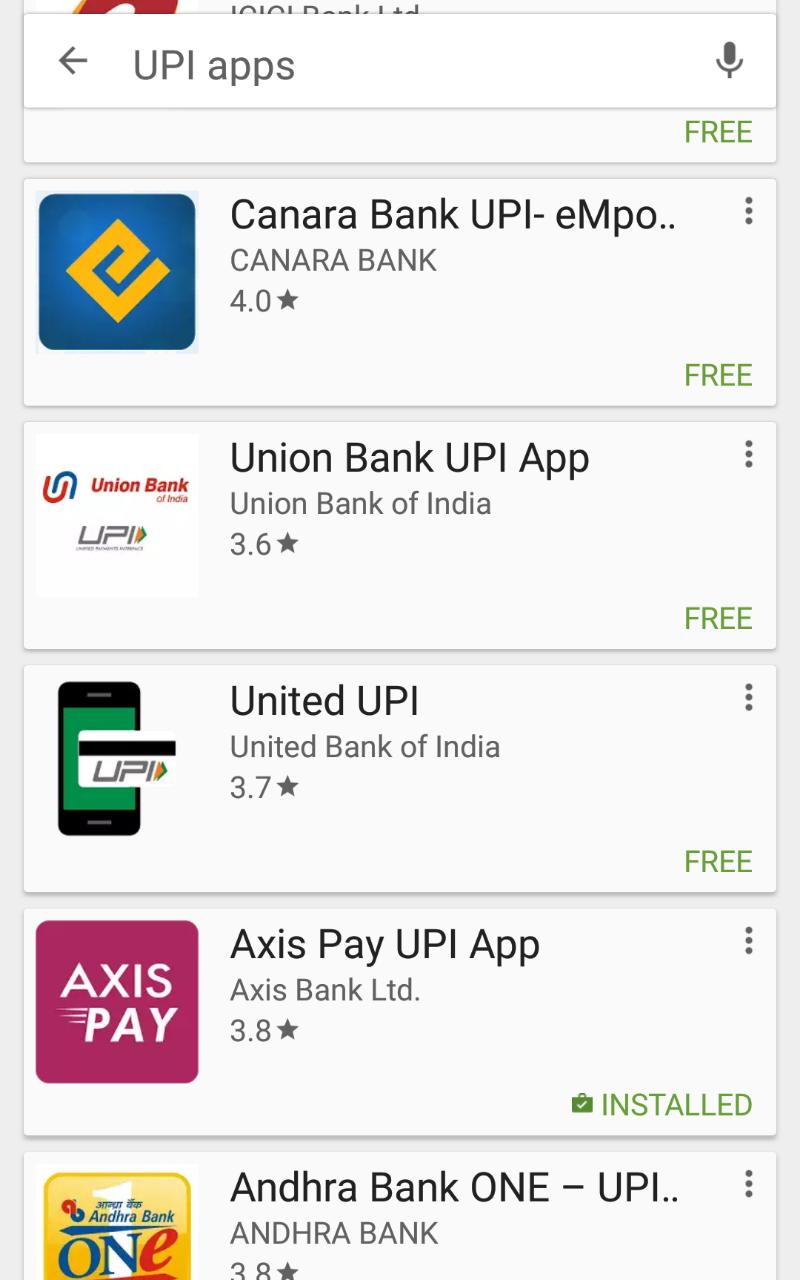
How do I get this UPI app?
There are about 28 different apps on Google Play (Android apps store) alone. You can search for “Your_Bankname UPI” (e.g. ICICI UPI) to find a UPI app by your bank. Remember that you should be downloading the official app of your bank.
(Update: Unfortunately, not many official apps are available for iOS yet. TrupayIndia app can be used to receive money so far. So Apple users will have to wait till banks come out with iOS versions)
But the beauty of UPI is that you don’t need to use your own bank’s apps if they have not yet come up with one. You can use any of those official and trusted apps that show up when you search for UPI apps.
In this post we will focus on UPI app by Flipkart called PhonePe, which is in partnership with Yes Bank, and Axis Bank’s UPI Pay app, which I think are the easiest to use so far of all apps (Pockets by ICICI comes a close third but is super feature rich, so try that too).
Once you download a UPI app, it will ask you to verify your phone number by sending and receiving SMS. In the next step you provide basic details like name, email, and set a 4 digit Pin.
How do I transact with UPI?
Step 1: Download and install a UPI app
Pick any of the apps when you search for UPI apps in app stores. I recommend PhonePe app, Axis Pay UPI app, or Pockets by ICICI.
This article will guide you with PhonePe app, but other apps will have mostly similar steps for registration and transaction.
Step 2: Launch app and register yourself
First verify your number. UPI system populates your bank account details and authenticates using phone number linked with your bank account. So install on phone with the number linked to your bank account only.

After number is verified, provide some basic details like Name and Email, and set a 4 digit password (Pin). If you ever forget your Pin, which you need for logging into the UPI app every time you use it, you’ll need access to your email to recover it.

Step 3: Add a virtual password address aka UPI Username
Just like your email, your UPI virtual password address (VPA) is your UPI ID which others will use to send you money. It’s of the form myupi@ybl or yurupi@icici (no .com needed). You can create up to 3 VPAs on PhonePe app and cannot delete them later yet, so be careful with your selection.
Swipe left to right to bring up the menu and press your number to go to your profile.
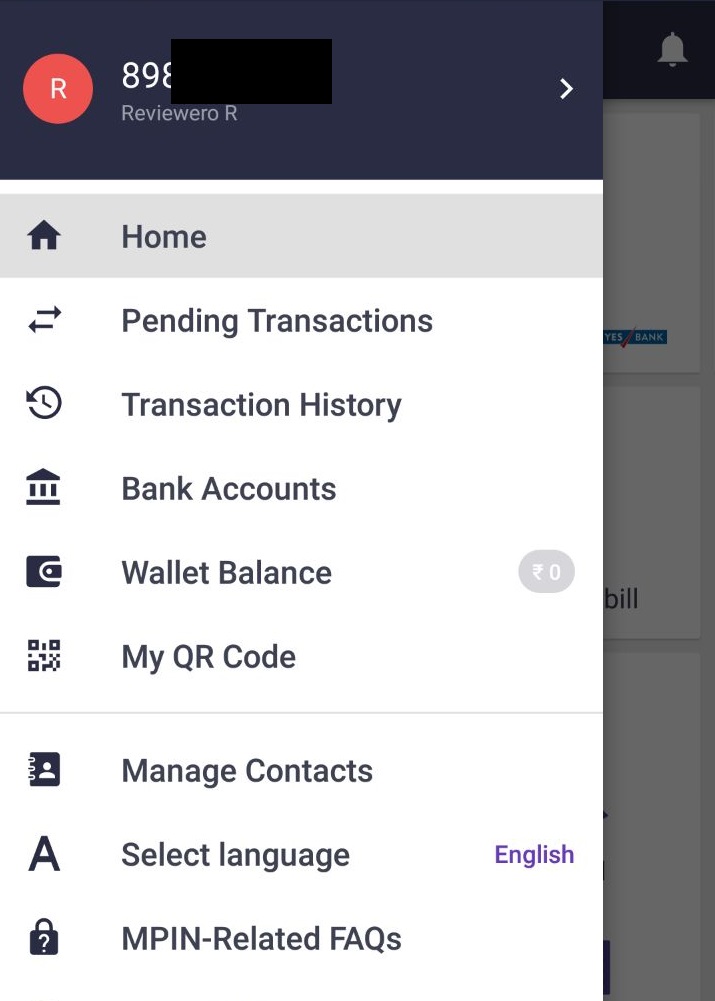
Find “Add VPA” option and add a VPA. Pick something easy to remember and spell out. Doesn’t have to be your name. For example, I could create one as myupi@ybl
VPA is not case sensitive so MyUPI@ybl is same as myupi@ybl

Step 4: Add a bank account
It’s easy. Swipe left to right. Go to Bank Accounts menu and press Add Bank Account button. Then select your bank. Your bank account linked with your phone number will be added without you needing to enter anything such as account number. You can add more than one account if you have multiple bank accounts linked to the same number.
It will also show you if an MPIN exists for that bank account. If not, you can create one by going to your banking app or website (some apps allow you to generate that without leaving the UPI app. You may need to enter your Debit Card details). If you have forgotten your bank MPIN, you can reset it from within the app:

And that’s it, with your bank account linked and VPA created, you are set to send and receive payments now. Let’s do a quick transaction.
Your first transaction
Step 1: Go to app home and click Send

Step 2: Go to VPAs and click Add VPA Contact
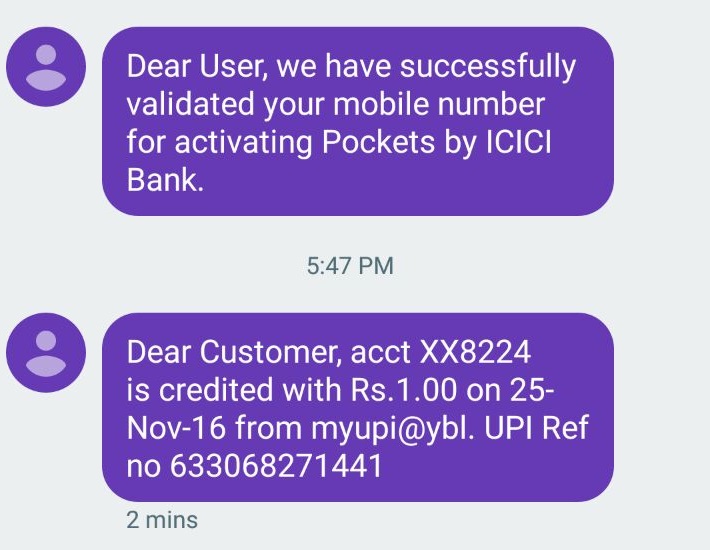
If you don’t have any one whose VPA you know, you can try sending Re 1 testupi@sbi – a working VPA we have created for testing purpose. You can also download other UPI apps like Pockets by ICICI and Axis Pay, create new VPAs, and send yourself money from other apps.
After you enter a VPA, you have to click verify button and it will verify if VPA is valid and also show registered name of the recipient (not shown in picture below for privacy reasons).

Step 3: Enter amount you’d like to send
When it asks you if you’d like to send money now, accept ‘Yes’ and move to the ‘send’ screen. Type the amount you want to send and from which linked bank account. As you can see from the screen you can even choose to send Re 1.
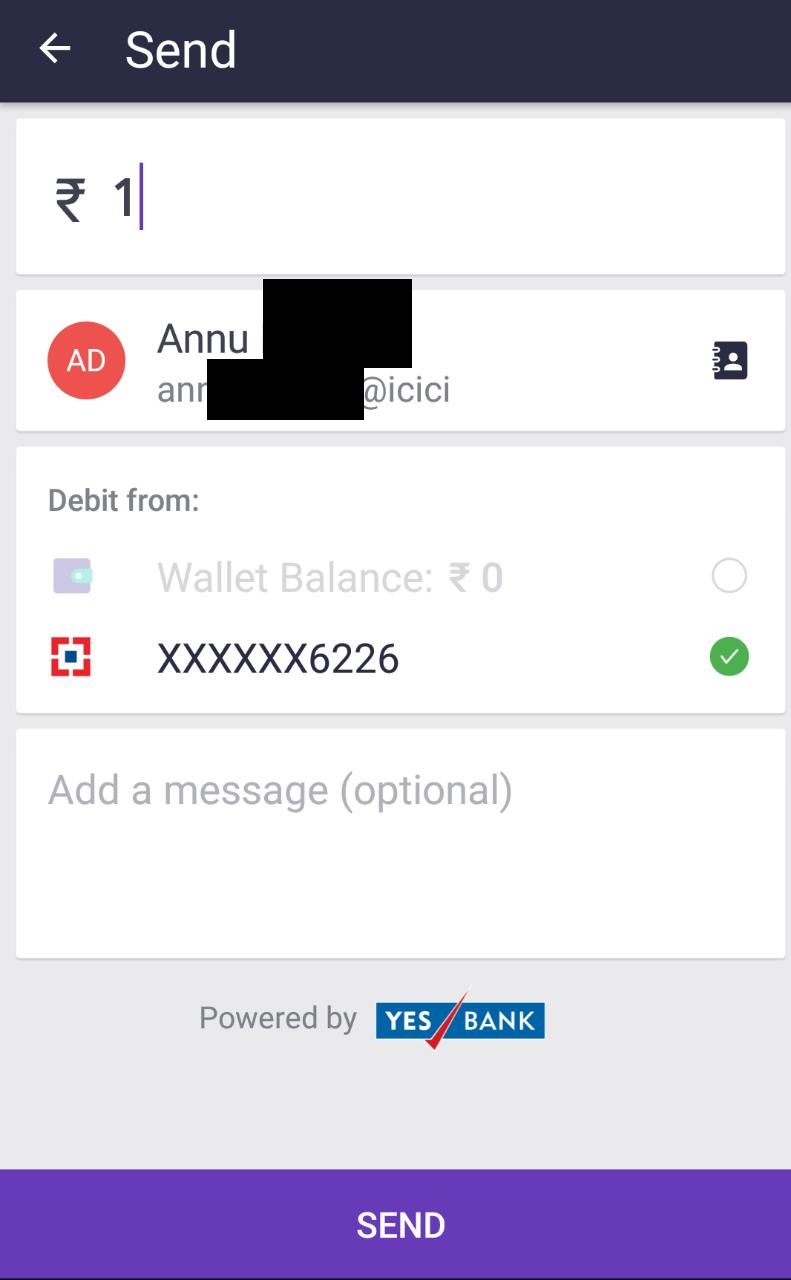
You will be taken to a screen by NPCI (National Payments Corporation of India) within the UPI app, where you will need to enter MPIN of the bank account linked to that VPA.
And done!
All this takes less than a minute.
Receiving money is even easier (it always is!). Remember that the money will come to the bank account that is associated as the default account with your VPA (that you provide someone for receiving the money).
Lots of UPI apps will let you pay bills and split bills with friends too. Some apps also have a QR code scan where you can send or accept money just by showing someone your QR code or scanning their QR code without having to enter VPAs.
Following is the a test QR code we created that is associated with testupi@sbi VPA. You can try transferring Re 1 by scanning it (we tested it on PhonePe app and it worked):

So in future, your local store could ask you to just scan their QR code to pay them directly from your bank account to theirs without any worries of looking for cash.
Remember that with UPI, currently your transaction value must be within 1 lakh rupees within India. For higher amount, you will have to use netbanking or traditional banking.
So try out these apps and let us know which ones you find easier to use. Still got questions? Ask away in the comments section below.
